Say you’ve decided to do Korean BBQ at home, you’ve bought the pork belly, and then it hits you: your smoke detector is mounted directly above the stove, your kitchen window opens about four inches, and the last time you pan-fried bacon the whole apartment smelled like it for two days. That’s not a reason to abandon the idea. It’s a reason to plan the setup before you plan the menu, because for this particular meal, the equipment and the ventilation decide whether the food is any good far more than the marinade does.
Quick Facts
| Time | 20 min prep, 30 min active grilling |
| Serves | 4 |
| Difficulty | Easy — the hard part is logistics, not cooking |
| Spice level | 0–2/5, mostly from the ssamjang and kimchi |
| Vegan? | Grill mushrooms, tofu and kimchi with the same technique; skip the meat |
What Korean BBQ at Home Actually Needs
At a restaurant, Korean BBQ works because of a built-in exhaust hood pulling smoke straight up and out, table by table. At home, you’re missing that single piece of infrastructure, and everything else in this guide is really about compensating for its absence. You need three things: a grill surface that can handle direct high heat, a way to move smoke and grease vapor out of the room, and a plan for the order things go on, because a home setup rarely has the same raw power as a restaurant grill and timing matters more as a result.
The Ventilation Problem
This is the part people skip past to get to the recipe, and it’s the part that actually determines whether the evening goes well. A few real options, roughly in order of how well they work:
Outdoors, if you have any access to it at all. A balcony, a shared courtyard, a fire escape with permission — even five minutes of that beats the best indoor setup. This isn’t really optional advice so much as the actual first choice if it exists.
A portable induction burner or butane stove set up directly under your kitchen exhaust hood, with the hood fan on its highest setting and running for a few minutes before you start cooking, not just during. Preheating the extraction, so to speak, gets air moving before the first piece of fat hits the pan.
Windows open on two sides of the room, ideally with a box fan in one of them blowing air out, creating actual cross-ventilation instead of a single window doing nothing against still air. One window cracked open does very little on its own.
Cover the smoke detector temporarily with a plastic bag if it’s directly above the cooking area — never disable it entirely, just shield it from direct smoke for the duration of cooking, and take the cover off the moment you’re done. Forgetting to remove it is the one real risk here.
If none of that is realistic in your space, a countertop grill with a water-pan design (the kind where fat drips into a tray of water instead of directly onto a hot element) produces meaningfully less smoke than an open flame or a dry pan, because the fat never gets hot enough to smoke in the first place. It’s a reasonable fallback, not a downgrade in flavor terms.
Equipment Options
| Setup | How it performs | Where to get it |
|---|---|---|
| Portable butane stove + cast-iron or nonstick Korean BBQ pan (the ridged, domed kind) | Closest to the restaurant experience — real char, real fat runoff. Needs an outdoor space or serious ventilation | Asian grocers and online; butane canisters are sold everywhere they’re stocked |
| Electric smokeless indoor grill (water-tray style) | Noticeably less smoke, slightly less char than open flame | Widely available online and at general retailers |
| Cast-iron skillet or griddle on your regular stovetop | Works fine for smaller portions, no special equipment needed, but produces the most smoke of the indoor options since there’s no design feature managing the fat | Whatever’s already in your kitchen |
| Outdoor charcoal or gas grill | Best flavor, zero indoor smoke concern | If you already have one, this solves the whole ventilation question |
What to Grill, and the Order It Actually Goes In
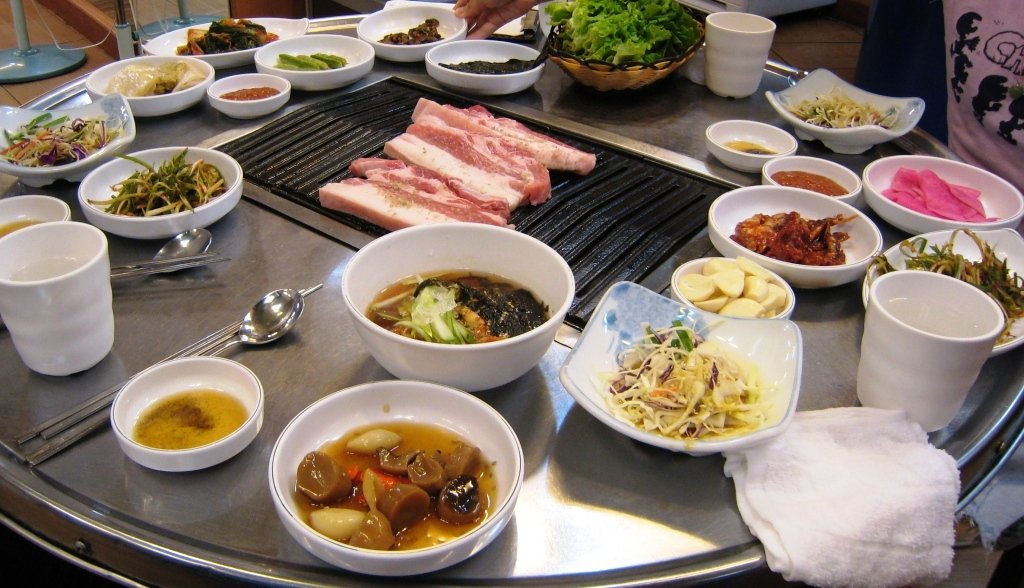
The order matters more than most people expect, and it’s built around one idea: fattier meats render usable cooking fat, and that fat is free flavor for everything that goes on after it. Samgyeopsal, thick-cut pork belly, goes first for exactly this reason — it’s unseasoned on purpose, since salt draws moisture out and slows down browning, and it needs a couple of undisturbed minutes per side to actually render rather than just steam.
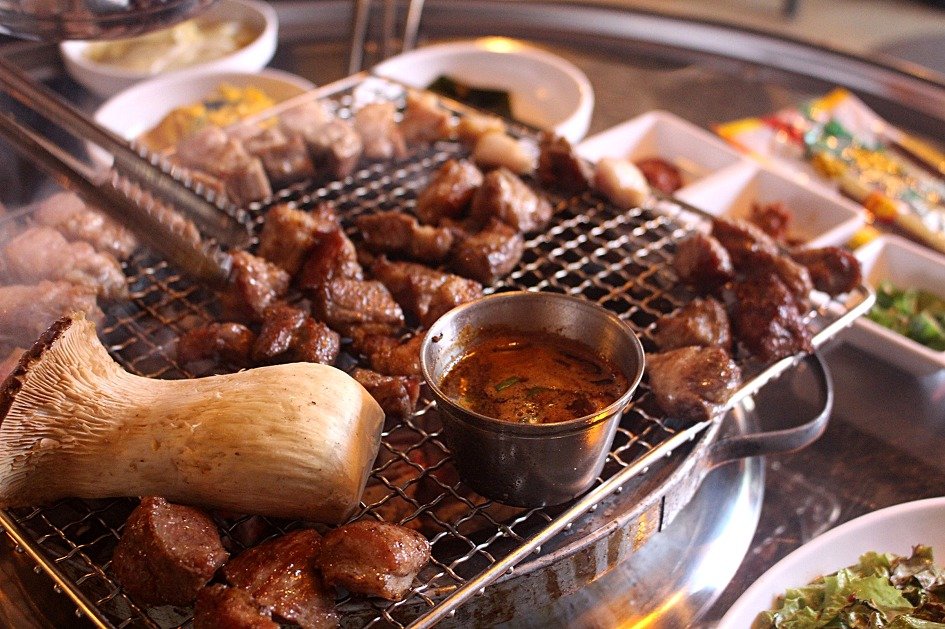
Once there’s a visible pool of fat on the grill, that’s the signal to add garlic, mushrooms and kimchi directly into it rather than onto a dry patch of grill surface. Kimchi grilled in pork fat is one of the better-kept secrets of a home Korean BBQ spread — it goes soft, slightly caramelized at the edges, and considerably less sharp than it is raw.
Marinated beef, usually bulgogi-cut, goes on last, close to when you’re ready to eat, because it’s sliced thin and cooks in under two minutes a side. Put it on too early alongside the pork, which needs a much longer total cooking time, and the beef will be gray and overdone by the time the pork is ready.
Korean BBQ at Home
Ingredients
Method
- Set up your grill (see equipment options below) and get ventilation running before you cook anything, not after the smoke starts.
- Preheat the grill or pan until a drop of water sizzles and evaporates within a second or two.
- Lay the pork belly down first, unseasoned, spaced so pieces aren’t touching. Let it render undisturbed for 2 minutes before flipping.
- Once a pool of rendered fat has collected, push the pork to one side and add the garlic cloves, mushrooms and kimchi directly into that fat. Let them cook in it rather than on a dry section of the grill.
- Flip the pork every 2 to 3 minutes, using scissors to snip thick pieces in half once they’re mostly cooked, so more surface area gets direct contact with the heat.
- Add the marinated beef last. Bulgogi-cut beef is thin and cooks in under 2 minutes per side — don’t put it on until the pork is nearly done, or it will overcook waiting.
- Add the onion wedges alongside the beef; they only need a couple of minutes to soften and pick up char at the edges.
- Serve everything straight off the grill with lettuce and perilla leaves, ssamjang, the sesame oil dip, and rice, so people build their own wraps as they go.
How to Run the Meal
- Set up ventilation first, whatever combination applies to your space, and get it running before anything touches heat.
- Preheat thoroughly. A grill that isn’t hot enough steams meat instead of browning it, and steamed pork belly is a genuinely disappointing thing to serve.
- Pork belly down first, unseasoned, spaced apart. Two minutes undisturbed per side minimum.
- Once fat pools, add garlic, mushrooms and kimchi into it. Let the fat do the seasoning work.
- Use scissors on the grill to cut thick pork pieces once they’re mostly done — more surface area means faster, more even finishing.
- Beef goes on last, alongside onion wedges, and comes off within two minutes a side.
- Serve immediately, family-style, with lettuce, perilla, ssamjang, the sesame-salt dip and rice, so everyone assembles their own wraps at their own pace.
Common Mistakes
Everything comes out steamed rather than seared: the grill wasn’t hot enough, or too much went on at once and dropped the surface temperature. Cook in smaller batches if your setup is underpowered.
The beef is gray and tough by the time it’s served: it went on too early and sat waiting for the pork to finish. Hold it back until the very end.
The whole apartment smells for two days afterward: ventilation wasn’t running before cooking started, only during, or not at all. Get air moving a few minutes ahead of the first piece of meat hitting the grill.
Storage
Leftover grilled meat keeps 2 to 3 days refrigerated and reheats best in a hot pan for a minute or two per side rather than the microwave, which turns pork belly rubbery. Grilled kimchi doesn’t store especially well — its texture was the point, and it goes soft and a little flat by the next day.
Common Questions
Can I do Korean BBQ at home without a special grill?
Yes. A cast-iron skillet or griddle on a regular stovetop works, it just produces more smoke than a dedicated water-tray grill, so ventilation matters even more. The technique — pork first, aromatics in the rendered fat, beef last — doesn’t change.
How do I stop my apartment from smelling like grilled meat for days?
Get air actively moving before you start cooking, not just during, and keep it running for a while after you’re done. A box fan in a window doing real cross-ventilation makes a bigger difference than most people expect compared to one window cracked open.
What’s the difference between samgyeopsal and bulgogi at a home BBQ spread?
Samgyeopsal is thick-cut, unmarinated pork belly grilled plain and dipped afterward; bulgogi is thin-sliced beef marinated in advance in a soy-sugar-garlic mixture before it ever touches the grill. They cook completely differently, which is exactly why bulgogi goes on last and cooks fast while pork belly goes on first and takes its time.
Related
For the pork belly itself, in more depth — the technique, the dipping sauces, the specific cut to ask for — see the full samgyeopsal recipe. If you’re supplying the beef side of the spread, bulgogi covers the marinade in detail. And the Korean pantry starter kit is worth a look before you shop, since ssamjang, sesame oil and gochugaru all show up here and in most other Korean BBQ cooking.